Object Mask Annotation 3D
Repository: https://github.com/OlafenwaMoses/vizion3D
Category: Annotation
Experimental: No
ObjectMaskAnnotation3D detects and instance-segments objects in a 2D RGB image, then back-projects each pixel-level segmentation mask onto the matching 3D points in a point cloud. The result is a labelled set of 3D sub-clouds — one per detected object — alongside an annotated point cloud where each object's points are recoloured with a unique colour.
A real photo is optional. When no image is provided the task synthesises a front-view RGB image by projecting the point cloud's own XYZ+RGB data into a 2D canvas; the segmentation then runs on that synthetic view.
Point-cloud inputs and outputs use OpenGL/viewer camera space: X+ right, Y+ up, and Z- forward into the scene.
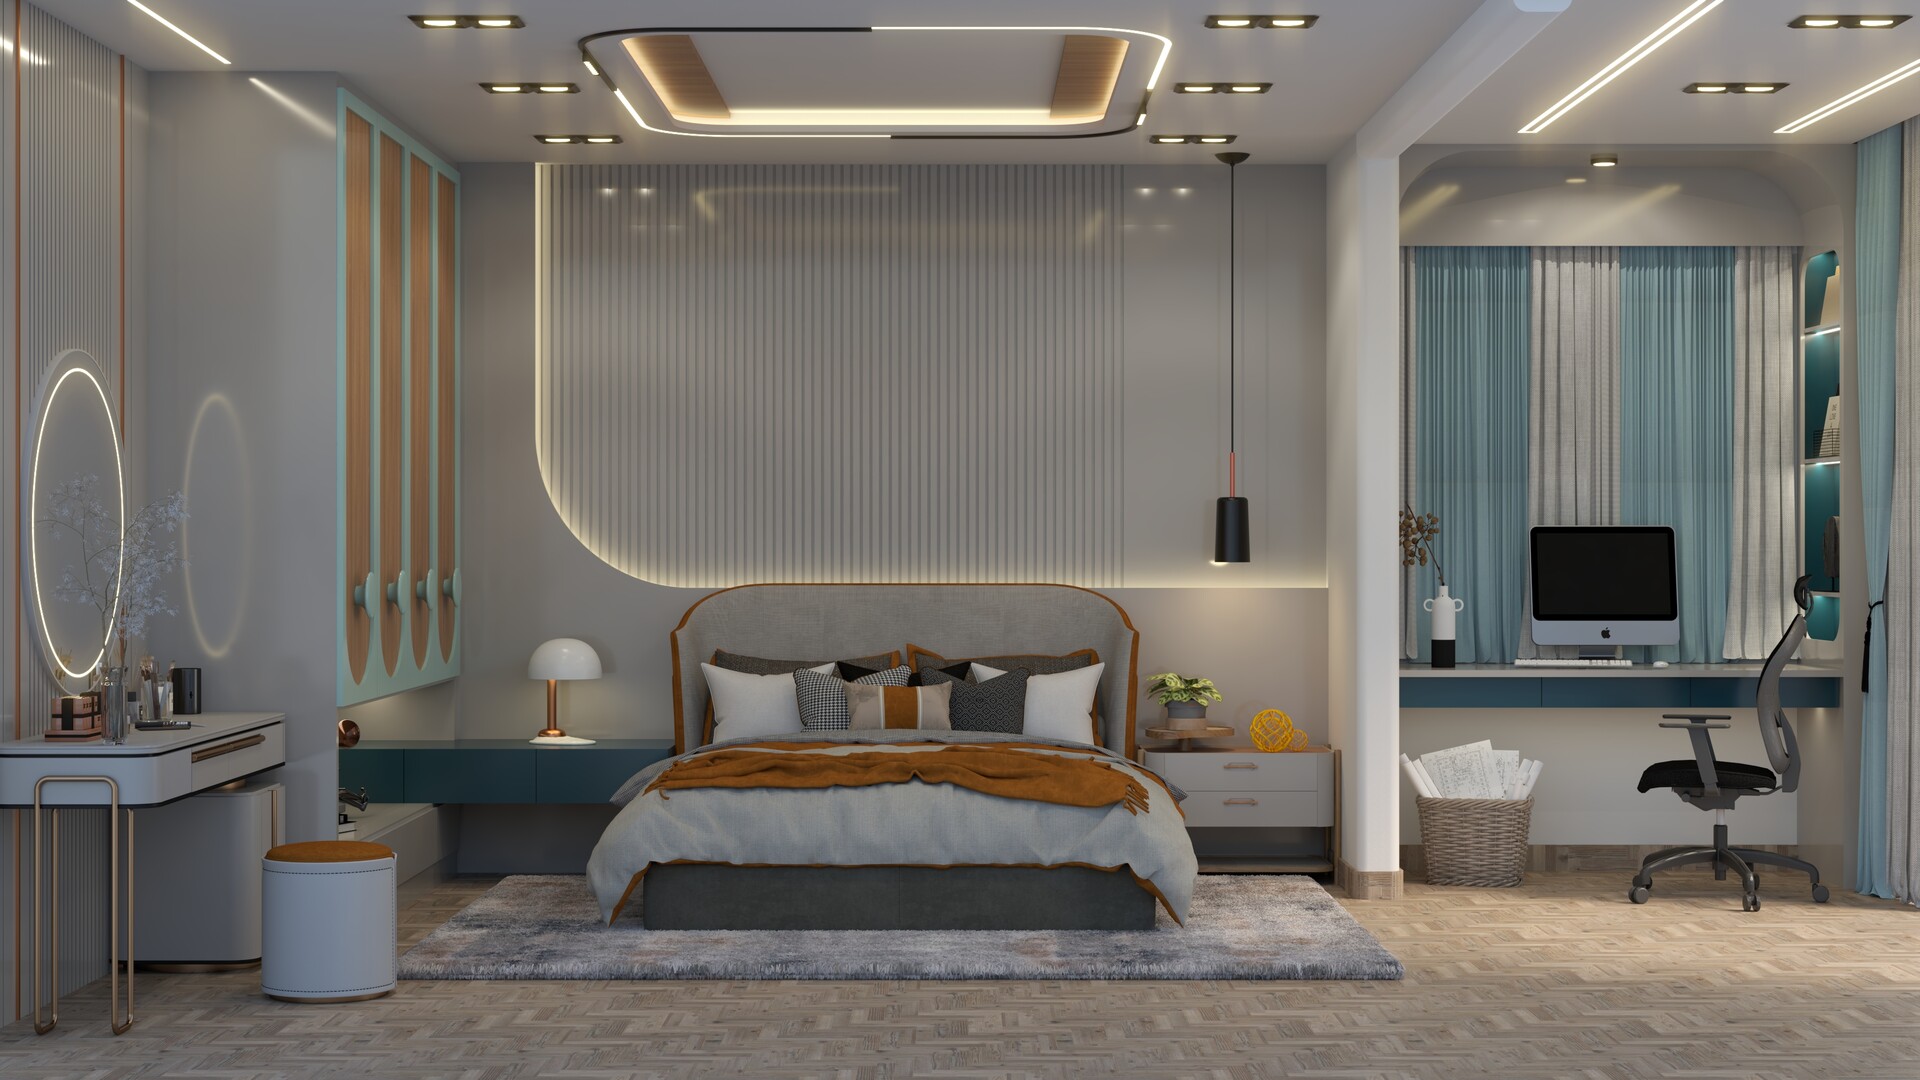
Detection results from the annotated scene above:
chair                 conf=0.91  3D points=20805
bed                   conf=0.90  3D points=180092
tv                    conf=0.90  3D points=18410
potted plant          conf=0.53  3D points=3447
keyboard              conf=0.45  3D points=1318
vase                  conf=0.38  3D points=2321
vase                  conf=0.33  3D points=2963
potted plant          conf=0.27  3D points=15436
Supported categories
The default checkpoint (yolo26l-seg.pt) is trained on the COCO dataset and can detect and segment 80 object categories. Each detected object is identified by its label (string) and class_id (0-based integer) in the result.
| Group | Categories |
|---|---|
| People | person |
| Vehicles | bicycle, car, motorcycle, airplane, bus, train, truck, boat |
| Outdoor | traffic light, fire hydrant, stop sign, parking meter, bench |
| Animals | bird, cat, dog, horse, sheep, cow, elephant, bear, zebra, giraffe |
| Accessories | backpack, umbrella, handbag, tie, suitcase |
| Sports | frisbee, skis, snowboard, sports ball, kite, baseball bat, baseball glove, skateboard, surfboard, tennis racket |
| Kitchen | bottle, wine glass, cup, fork, knife, spoon, bowl |
| Food | banana, apple, sandwich, orange, broccoli, carrot, hot dog, pizza, donut, cake |
| Furniture | chair, couch, potted plant, bed, dining table, toilet |
| Electronics | tv, laptop, mouse, remote, keyboard, cell phone |
| Appliances | microwave, oven, toaster, sink, refrigerator |
| Indoor | book, clock, vase, scissors, teddy bear, hair drier, toothbrush |
Objects not in this list will not be detected by the default checkpoint. To
annotate other categories, supply a custom YOLO segmentation checkpoint via
model_backend, or use the prompt-free YOLOE model described below for broader
annotation coverage.
Model backend
Default checkpoint download: yolo26l-seg.pt
curl -L \
  https://github.com/OlafenwaMoses/vizion3D/releases/download/essentials-v1/yolo26l-seg.pt \
  -o yolo26l-seg.pt
| Value | What happens |
|---|---|
| (default) | Downloads yolo26l-seg.pt to ~/.cache/vizion3d/models/ on first use, then loads it from cache |
A local .pt file path |
Loaded directly — never downloaded |
Models are kept in memory after the first inference in the current process. Subsequent calls to any ObjectMaskAnnotation3D instance reuse the loaded weights. Set VIZION3D_MODEL_CACHE in your environment to change the default cache directory.
Command parameters
ObjectMaskAnnotation3DCommand is the input contract for this task.
| Parameter | Type | Required | Default | Description |
|---|---|---|---|---|
point_cloud |
open3d.geometry.PointCloud |
Yes | — | Input point cloud in OpenGL/viewer camera space (X right, Y up, Z negative forward), coordinates in metres. |
image_input |
str \| bytes \| None |
No | None |
RGB image to segment. Pass a file path string or raw image bytes. When None, a front-view image is synthesised from the point cloud automatically. |
model_backend |
str |
No | vizion3D release checkpoint URL | YOLO segmentation checkpoint URL or local path. |
return_object_clouds |
bool |
No | False |
When True, each MaskAnnotation3D includes an object_cloud — an extracted point cloud for that object with original colours preserved. |
return_annotated_cloud |
bool |
No | False |
When True, the result includes a copy of the full point cloud with detected object points recoloured per object. |
advanced_config |
ObjectMaskAnnotation3DConfig |
No | auto-derived from image | Camera intrinsics and detection thresholds. See Advanced config below. |
Result fields
ObjectMaskAnnotation3DResult is the output contract for this task.
| Field | Type | Always present | Description |
|---|---|---|---|
annotations |
list[MaskAnnotation3D] |
Yes | Per-object annotations, sorted in descending confidence order. |
annotated_cloud |
open3d.geometry.PointCloud \| None |
When return_annotated_cloud=True |
Full point cloud copy with each detected object's points repainted in a unique colour. Non-object points keep their original colour. Coordinates remain OpenGL/viewer camera space (X+ right, Y+ up, Z- forward). |
backend_used |
str |
Yes | Resolved local file path of the YOLO checkpoint used. |
Each MaskAnnotation3D item contains:
| Field | Type | Description |
|---|---|---|
label |
str |
Model class name, e.g. "person", "chair". With the default checkpoint this is a COCO class name; with prompt-free YOLOE this is a YOLOE runtime label. |
class_id |
int |
Model class index (0-based). With the default checkpoint this is the COCO class index. |
confidence |
float |
Detection confidence in [0, 1]. |
bbox_2d |
list[float] |
Bounding box in image pixels: [x1, y1, x2, y2]. |
mask_2d |
np.ndarray |
Boolean segmentation mask, shape (H, W). |
point_indices |
list[int] |
Indices into the original input point cloud for all matched 3D points. |
point_coords |
list[list[float]] |
[[x, y, z], ...] in metres for each matched point, using OpenGL/viewer camera space. |
object_cloud |
open3d.geometry.PointCloud \| None |
Extracted sub-cloud for this object with original colours and the same OpenGL/viewer coordinate space. Present when return_object_clouds=True. |
1. Direct Python import — with an image
Provide an image (bytes or file path) alongside the point cloud.
import open3d as o3d
from vizion3d.annotation import ObjectMaskAnnotation3D, ObjectMaskAnnotation3DCommand

pcd = o3d.io.read_point_cloud("scene.ply")

with open("scene.jpg", "rb") as f:
    img_bytes = f.read()

result = ObjectMaskAnnotation3D().run(
    ObjectMaskAnnotation3DCommand(
        point_cloud=pcd,
        image_input=img_bytes,
    )
)

print(f"Backend used : {result.backend_used}")
for ann in result.annotations:
    print(f"  {ann.label:20s}  conf={ann.confidence:.2f}  3D points={len(ann.point_indices)}")
2. Direct Python import — point cloud only (no image)
When image_input is omitted, the task synthesises a front-view RGB image directly from the point cloud's own XYZ+RGB data and runs segmentation on that synthetic view. This covers two common situations:
No image available at all — the point cloud came from a file, a scan, or a pipeline that did not preserve the original photo. The synthesised view is the only option.
Stereo source with two images — a stereo cloud is generated from a left and right image pair, but those are two separate images taken from slightly different viewpoints. There is no single image that naturally represents the combined stereo view. In this case, let the system synthesise the view from the point cloud — the synthesised view is computed from the cloud's 3D positions and stored colours, so it does not require choosing between the two frames. See section 5 for the full stereo workflow.
The synthesised image is a point-splatting projection: each point's XYZ is projected into pixel coordinates using the camera intrinsics, and its RGB colour is painted onto a canvas. For depth-estimation clouds (one point per pixel) the result is nearly identical to the original photo. For stereo clouds or scans with variable density, sparse or occluded regions produce a patchy image that may reduce detection quality compared to a real photo.
Stereo clouds require explicit intrinsics. When annotating a stereo point cloud without an image, the auto-derive heuristic cannot infer the correct focal length from the cloud geometry alone. Pass
advanced_configwith the stereo rig's actualfx,fy,cx,cyto ensure back-projection aligns masks with the 3D points. See section 5 and Advanced config.
import open3d as o3d
from vizion3d.annotation import ObjectMaskAnnotation3D, ObjectMaskAnnotation3DCommand

pcd = o3d.io.read_point_cloud("scene.ply")

result = ObjectMaskAnnotation3D().run(
    ObjectMaskAnnotation3DCommand(point_cloud=pcd)
)

for ann in result.annotations:
    print(f"{ann.label}: {len(ann.point_indices)} points")
3. Annotated point cloud
Request a full copy of the point cloud with each detected object recoloured in a unique colour.
import open3d as o3d
from vizion3d.annotation import ObjectMaskAnnotation3D, ObjectMaskAnnotation3DCommand

pcd = o3d.io.read_point_cloud("scene.ply")

result = ObjectMaskAnnotation3D().run(
    ObjectMaskAnnotation3DCommand(
        point_cloud=pcd,
        image_input="scene.jpg",
        return_annotated_cloud=True,
    )
)

if result.annotated_cloud is not None:
    o3d.io.write_point_cloud("annotated.ply", result.annotated_cloud)
4. Per-object clouds
Set return_object_clouds=True to obtain an isolated point cloud for each detected object. Each sub-cloud uses the original colours from the input point cloud.
import open3d as o3d
from vizion3d.annotation import ObjectMaskAnnotation3D, ObjectMaskAnnotation3DCommand

pcd = o3d.io.read_point_cloud("scene.ply")

result = ObjectMaskAnnotation3D().run(
    ObjectMaskAnnotation3DCommand(
        point_cloud=pcd,
        image_input="scene.jpg",
        return_object_clouds=True,
    )
)

for i, ann in enumerate(result.annotations):
    if ann.object_cloud is not None:
        path = f"object_{i:02d}_{ann.label}.ply"
        o3d.io.write_point_cloud(path, ann.object_cloud)
        print(f"Saved {path}  ({len(ann.point_indices)} points)")
5. Stereo point cloud integration
Point clouds produced by Stereo Depth are in OpenGL/viewer camera space (X right, Y up, Z negative forward, origin at the left camera), which is exactly what this task expects. To annotate a stereo cloud correctly:
- Always pass the stereo camera intrinsics via
advanced_config. The default values are for a PrimeSense sensor and will not produce back-projection that matches any other stereo rig. - Do not pass
image_input— a stereo cloud comes from two images taken at slightly different viewpoints and there is no single image that represents the combined view. Leaveimage_inputunset and the system will synthesise the segmentation image directly from the point cloud's stored colours. - Do not centroid-shift the point cloud before passing it in. The PLY viewer handles visual centering in JavaScript; shifting the cloud in Python breaks the
Z < 0forward-space requirement that back-projection depends on.
import open3d as o3d
from vizion3d.annotation import ObjectMaskAnnotation3D, ObjectMaskAnnotation3DCommand
from vizion3d.annotation.models import ObjectMaskAnnotation3DConfig

pcd = o3d.io.read_point_cloud("stereo_result.ply")

# Intrinsics must match the stereo rig used to generate the cloud.
# Read these from your calib.txt: cam0=[fx 0 cx; 0 fy cy; 0 0 1]
stereo_cfg = ObjectMaskAnnotation3DConfig(
    fx=1733.74,
    fy=1733.74,
    cx=792.27,
    cy=541.89,
)

result = ObjectMaskAnnotation3D().run(
    ObjectMaskAnnotation3DCommand(
        point_cloud=pcd,
        return_annotated_cloud=True,
        advanced_config=stereo_cfg,
    )
)

for ann in result.annotations:
    print(f"{ann.label:20s}  conf={ann.confidence:.2f}  3D points={len(ann.point_indices)}")

o3d.io.write_point_cloud("annotated_stereo.ply", result.annotated_cloud)
Detection results from the stereo point cloud annotation:
chair                 conf=0.87  3D points=106616
chair                 conf=0.85  3D points=54834
chair                 conf=0.53  3D points=4517
chair                 conf=0.51  3D points=20499
chair                 conf=0.48  3D points=22956
chair                 conf=0.39  3D points=30634
chair                 conf=0.36  3D points=11034
chair                 conf=0.31  3D points=11890
chair                 conf=0.29  3D points=118946
chair                 conf=0.28  3D points=11229
chair                 conf=0.25  3D points=18532
The stereo pipeline can also generate the point cloud and annotate it in a single script:
import open3d as o3d
from vizion3d.stereo import StereoDepth, StereoDepthCommand, StereoDepthAdvancedConfig
from vizion3d.annotation import ObjectMaskAnnotation3D, ObjectMaskAnnotation3DCommand
from vizion3d.annotation.models import ObjectMaskAnnotation3DConfig

# Step 1 — stereo depth → point cloud
stereo_result = StereoDepth().run(
    StereoDepthCommand(
        left_image="left.png",
        right_image="right.png",
        return_point_cloud=True,
        advanced_config=StereoDepthAdvancedConfig(
            focal_length=1733.74,
            cx=792.27,
            cy=541.89,
            baseline=536.62,
        ),
    )
)

# Step 2 — annotate the stereo cloud (reuse the same intrinsics)
# image_input is omitted — the system synthesises the segmentation view from the cloud.
annotation_result = ObjectMaskAnnotation3D().run(
    ObjectMaskAnnotation3DCommand(
        point_cloud=stereo_result.point_cloud,
        return_annotated_cloud=True,
        advanced_config=ObjectMaskAnnotation3DConfig(
            fx=1733.74,
            fy=1733.74,
            cx=792.27,
            cy=541.89,
        ),
    )
)

for ann in annotation_result.annotations:
    print(f"{ann.label:20s}  conf={ann.confidence:.2f}  3D points={len(ann.point_indices)}")

o3d.io.write_point_cloud("annotated_stereo.ply", annotation_result.annotated_cloud)
6. REST API
Start the server:
pip / Poetry
vizion3d-serve-rest
uv
uv run vizion3d-serve-rest
To preload the annotation checkpoint at startup:
uv run vizion3d-serve-rest --object_mask_annotation_3d \
  --annotation_model /models/yolo26l-seg.pt
Send a request with multipart/form-data. The image field is optional — omit it to let the server synthesise the front view.
With an image:
curl -X POST "http://localhost:8000/annotation/object-mask-annotation-3d" \
  -F "image=@scene.jpg" \
  -F "point_cloud_ply=@scene.ply" \
  -F "return_annotated_cloud=true"
Point cloud only:
curl -X POST "http://localhost:8000/annotation/object-mask-annotation-3d" \
  -F "point_cloud_ply=@scene.ply"
Response — JSON with base64-encoded binary fields:
{
  "backend_used": "/path/to/yolo26l-seg.pt",
  "annotations": [
    {
      "label": "chair",
      "class_id": 56,
      "confidence": 0.87,
      "bbox_2d": [120.0, 80.0, 350.0, 420.0],
      "mask_image": "<base64-encoded PNG>",
      "point_indices": [12, 45, 103, ...],
      "object_cloud_ply": null
    }
  ],
  "annotated_cloud_ply": "<base64-encoded PLY>"
}
7. gRPC API
Start the server:
pip / Poetry
vizion3d-serve-grpc
uv
uv run vizion3d-serve-grpc
import grpc
from vizion3d.proto import lifting_pb2, lifting_pb2_grpc

channel = grpc.insecure_channel("localhost:50051")
stub = lifting_pb2_grpc.LiftingServiceStub(channel)

with open("scene.ply", "rb") as f:
    ply_bytes = f.read()

with open("scene.jpg", "rb") as f:
    img_bytes = f.read()

request = lifting_pb2.ObjectMaskAnnotation3DRequest(
    image_bytes=img_bytes,       # omit or leave empty for front-view synthesis
    point_cloud_ply=ply_bytes,
    return_annotated_cloud=True,
)

response = stub.RunObjectMaskAnnotation3D(request)
print(f"Backend : {response.backend_used}")
for item in response.annotations:
    print(f"  {item.label:20s}  conf={item.confidence:.2f}")
Advanced config
ObjectMaskAnnotation3DConfig controls camera intrinsics and inference thresholds.
| Field | Type | Default | Description |
|---|---|---|---|
fx |
float \| None |
None |
Horizontal focal length in pixels. Auto-derived as image_width × 0.85 when None. |
fy |
float \| None |
None |
Vertical focal length in pixels. Auto-derived as image_width × 0.85 when None. |
cx |
float \| None |
None |
Principal point x (optical axis column). Auto-derived as image_width / 2 when None. |
cy |
float \| None |
None |
Principal point y (optical axis row). Auto-derived as image_height / 2 when None. |
conf_threshold |
float |
0.25 |
Minimum detection confidence to keep. Range [0, 1]. |
iou_threshold |
float |
0.45 |
Non-maximum suppression IoU overlap threshold. Range [0, 1]. |
When intrinsics are None (the default), the handler derives them from the actual image dimensions using the same 0.85 × width field-of-view heuristic as the depth estimation pipeline. This means a point cloud generated by DepthEstimation can be annotated without any config — the back-projection automatically matches the intrinsics used to generate the cloud. Supply explicit values only when using a calibrated camera or a custom point cloud source. Not sure what these values are? See Camera Intrinsics Matrix.
from vizion3d.annotation import (
    ObjectMaskAnnotation3D,
    ObjectMaskAnnotation3DCommand,
    ObjectMaskAnnotation3DConfig,
)
import open3d as o3d

pcd = o3d.io.read_point_cloud("scene.ply")

result = ObjectMaskAnnotation3D().run(
    ObjectMaskAnnotation3DCommand(
        point_cloud=pcd,
        image_input="scene.jpg",
        advanced_config=ObjectMaskAnnotation3DConfig(
            fx=615.0,
            fy=615.0,
            cx=320.0,
            cy=240.0,
            conf_threshold=0.3,
        ),
    )
)
Known limitations
- Relative depth point clouds — if the input point cloud was generated by monocular depth estimation (which produces relative, not metric, depth), object sizes in 3D will not correspond to real-world dimensions. For metric results, use a calibrated stereo or RGB-D camera.
- Open3D required — this task requires Open3D, which currently only supports Python 3.12 in this project.
- Front-view synthesis — when no image is supplied, the synthesised view is a simple point-splatting projection. Dense regions render well; sparse or occluded regions may produce a patchy image that reduces detection quality compared to a real photo.
Prompt-free YOLOE model for broader annotation
ObjectMaskAnnotation3D also supports the prompt-free YOLOE segmentation
checkpoint released with the essentials bundle:
https://github.com/OlafenwaMoses/vizion3D/releases/download/essentials-v1/yoloe-26l-seg-pf.pt
The model can be passed directly through model_backend; no annotation-library
code changes are required:
annotation_result = ObjectMaskAnnotation3D().run(
    ObjectMaskAnnotation3DCommand(
        point_cloud=pcd,
        image_input="scene.jpg",
        model_backend=(
            "https://github.com/OlafenwaMoses/vizion3D/releases/download/"
            "essentials-v1/yoloe-26l-seg-pf.pt"
        ),
    )
)
This prompt-free model exposes 4,585 runtime labels, so it is useful when the goal is broad instance annotation beyond the default COCO categories.
Recommended use:
- Use the default
yolo26l-seg.ptcheckpoint when COCO coverage is sufficient and higher closed-set COCO segmentation accuracy is preferred. - Use
yoloe-26l-seg-pf.ptwhen broad prompt-free annotation is more important than COCO-only precision. - For ScaleObservation,
yoloe-26l-seg-pf.ptcan provide additional useful labels such as desks, cabinets, monitors, doors, and appliances. Most of its 4,585 labels still do not have calibrated metric priors, so unsupported labels are ignored by the scale estimator. See Scale Observation for the current prior list.
The supported prompt-free labels are listed and grouped here:
The class reference is generated from the packaged runtime label metadata used by the annotation task.